This tutorial is going to demonstrate how to take a screenshot on Windows two ways. The first is the snipping tool which allows you to crop and save screenshots as images. The second is using the print screen function to save a screen shot to your clipboard.
Accessing the Snipping Tools
Press the
Starticon.
type “Snip” into the search bar.
Click the
Snipping toolicon.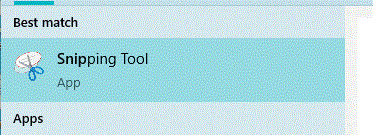
Using the Snipping Tool to Take a Screenshot
- Click the
Newbutton. - Drag your cursor around the area you want to take a screenshot of. The area within the screenshot will look clear while the rest will be washed out.
- Once finished, the Snipper Tool will automatically show the new picture but it will not automatically save it.
- To save, click the
Saveicon. Or, clickFilethenSave As. - Enter the name for your photo. And choose where you want to save it to.
Using the Print Screen Key
On most keyboards designed for Windows there is a dedicated keyboard key called Print Screen often abbreviated as PrtScn, PrtSc, or PrntScrn
To use print screen to take a picture of your screen, press
PrntScrnor the button as it appears on your keyboard.Note: you may or may not see a quick flash indicating the screenshot was taken successfully.
The image will be stored on your clipboard. You can check by pressing
Start+V.Save the image by copying it somewhere such as a Word document or Email by pressing
Control+V.