Installing SSH on Linux and Generating Public and Private Keys

What is SSH?
SSH stands for Secure Shell and it is a way for systems to communicate with each other by sending encrypted data over a network. SSH is one of the most secure ways to send and receive data and is the method relied on by the data centers that manage tons of information and keep the Internet as we know it running. It is also relied on by many including developers and systems admins because it is a reliable way to access servers. Combined, with SSH keys, it can even eliminate the need for passwords when remote connecting to servers.
The reason that SSH is relied on because it is universal, working on Linux, Mac, and Windows. It can be controlled through a command prompt or GUI based programs such as the popular PUTTY client for windows.
One of the first steps for setting up a remote server, whether it be through a provider like ZebraHost or a private on-premises cloud, is to enable SSH access and to generate a public and private key so that two systems can send encrypted information remotely.
SSH works by generating two keys. One public key and one private key. The private key only lives on the machine you want to SSH into your server from. The public key can be copied to any server or machine you want to access remotely. This is great for security because regardless of who has your public key, as long as only you have your private key, only you can log in with it. This even opens up opportunities like being able to securely access your server as a root user or without a password.
Installing SSH Access on Linux
the first step to enabling SSH access is to install Secure Shell. We will be doing this via Open SSH. To do this, type:
sudo apt-get install openssh-server
After clicking enter you will be prompted if you want to continue (Y/N). Types Yes.
Once open SSH is installed you will be ready to use basic SSH in order to access your machine remotely. All you have to do is type your username, IP, and password and you will be able to log into your machine remotely. However, this is considered the least secure way to access your machine as anyone that knows your credentials can access your machine via SSH.
To make your machine more secure, you will need to generate a public and private SSH key. The advantage of using public/private keys is that because the two keys must “talk” to each other, even if someone learns what your credentials are or sees your public key, without knowing the private key there is no way they can access your server.
How to Generate Public and Private Keys on Linux
Think of a public key and a private key as a lock and key. The lock can go on any door you want but without the key it’s inaccessible. The public key lives on any server you want to access while your private key lives on the machine that you use to access the server. This allows you to have control over your server or if you want, multiple servers.
On your host Linux machine, you will start by generating a public and private key using either of the commands below:
Type either:
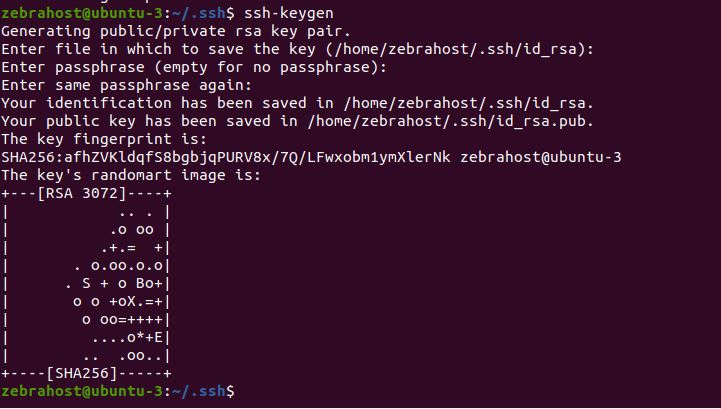
ssh-keygen
or
ssh-keygen -t rsa
Then, as shown below you will have options such as setting up a passphrase to protect your keys. In this example, we will simply click Enter to skip entering a passphrase and go straight to generating our public and private key.
Now that the keys are generated, you will want to copy your public key over to your server while your private key remains on the host machine.
To do this, first go into your .ssh directory by using:
cd.ssh
Then, type:
ssh-copy-id username@serverIP
If done correctly, you will see that 1 key has been added to the server. This is the public key that will allow you to access your server via public/private key access.

Try logging into your server. If your SSH keys have been generated and placed successfully, you will no longer need your password. Rather, Ubuntu will use your private key generated on your host machine to access your server.
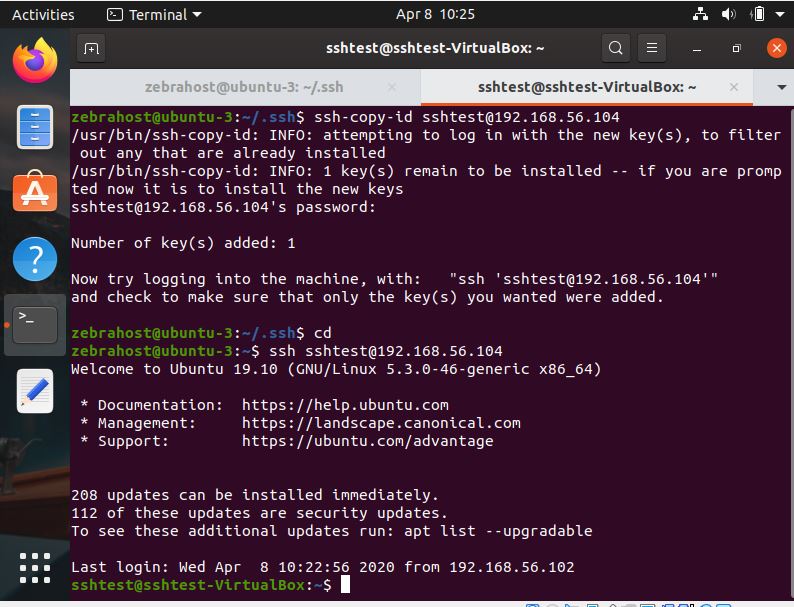
The above screenshot is an example of what your machine should look like if you have properly SSH’d into your machine using keys. Notice that after I typed ssh [email protected] I was not asked for a password and my server simply said Welcome to Ubuntu 19.10
Generating SSH Keys on Windows
Because the ability to generate public and private keys is not fully baked into Windows, we will be generating our keys via a program called PUTTY. Putty is a client that allows users to log into their servers via SSH.
Putty is GUI-based and as such will generate public/private keys using a different method.
To start, download [Putty](http://because the ability to generate public and private keys is not fully baked into windows%2C we will be generating our keys via a program called putty. putty is a client that allows users to log into their servers via ssh. putty is gui-based and as such will generate public/private keys using a different method. To start, download Putty. Link: https://www.putty.org/ Once PuTTY is installed on your system, you will open the client and first test to make sure you can SSH into your server without keys.).
Testing SSH Without SSH Keys
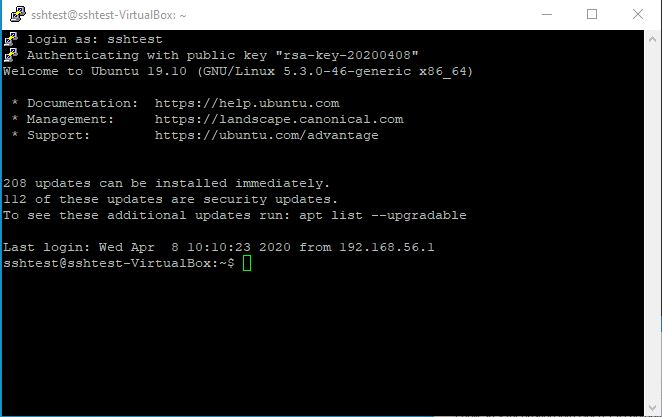
Once PuTTY is installed on your system, you will open the client and first test to make sure you can SSH into your server without keys.
To do this, simply type either your server IP address or username@server address into the “Host Name (or IP address)” bar towards the top of the PuTTY program.

Once you click Enter, you will be asked either which user you would like to log in as or the password for that user. If done correctly, you will login successfully to your server similar to the image below.
Generating SSH Keys via PuTTY
Now that you know your server is accessible from your host machine through normal SSH, you can begin to generate your SSH keys.
To do this, you will want to exit your session if it is active, then search for Putty Key Generator in your start menu. Open this program and click “Generate” with parameters set to RSA
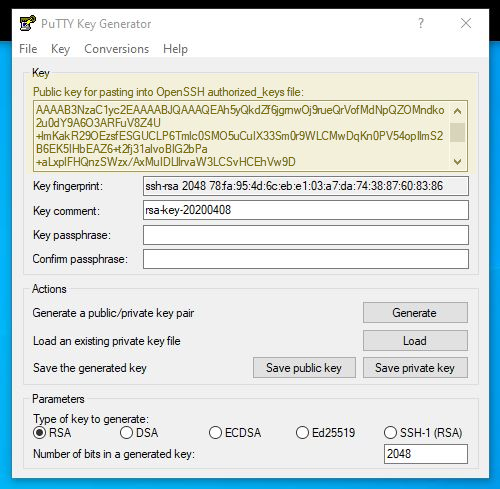
Once your key is generated, click save for both the private and public keys to a private, secure folder where no one will see them (especially for the private key).
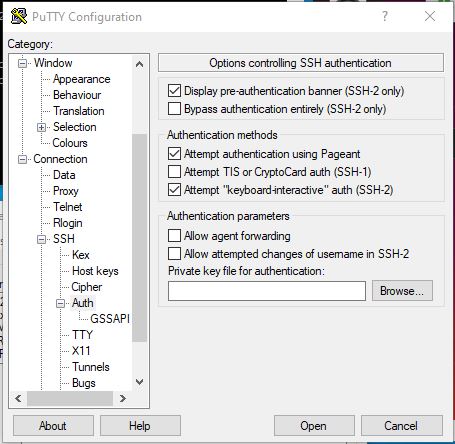
Go back to your regular PuTTY program and then type in your IP address in the “Host Name (or IP address)” bar and then without logging into your server, go to the Category window, then scroll down to SSH, then click “Auth” and browse for the private key you generated.
Once that is uploaded, you will then SSH login to your server like normal. You will still need your password because you need to upload your public key to the server.
Once you’ve logged into your server, type:
cd. ssh
This will bring you to the ssh directory you need
Then type:
nano authorized keys
then paste the public key that PuTTY generated in a new line. See below which key to copy.
Click CTRL+X then Enter
You will now have the proper public key loaded onto your server
Setting Up One-Click Login Parameters for PuTTY
In order to set up one-click login using your public/private keys, you will need to set up a session profile in PuTTY.
First, type your IP in the “Host Name (or IP address)” bar.
Then go to the Category window. Connection -> Data -> Auto-login username.
Enter your username so that you don’t need to enter your username each time you log in to your server.
Then, Category -> Connection -> SSH -> + -> Auth -> Private key file for authentication.
Click Browse and locate your private key file generated earlier.
Return to “Session” in the Category window.
Enter a name for your Session under Saved Sessions and then click Save.
Now, you can double click your session name or click the session and the load button. With SSH access enabled you will be able to log into your server with just your public/private key combination with no password or username needed.
Below is an example of a successful login with SSH keys: